
Portrait retouching algorithm in photoshop
Like any professional with experience, I want to share my knowledge with you and am starting a series of articles that will help a beginner or already practicing retoucher.
🟢 Loading and analyzing images
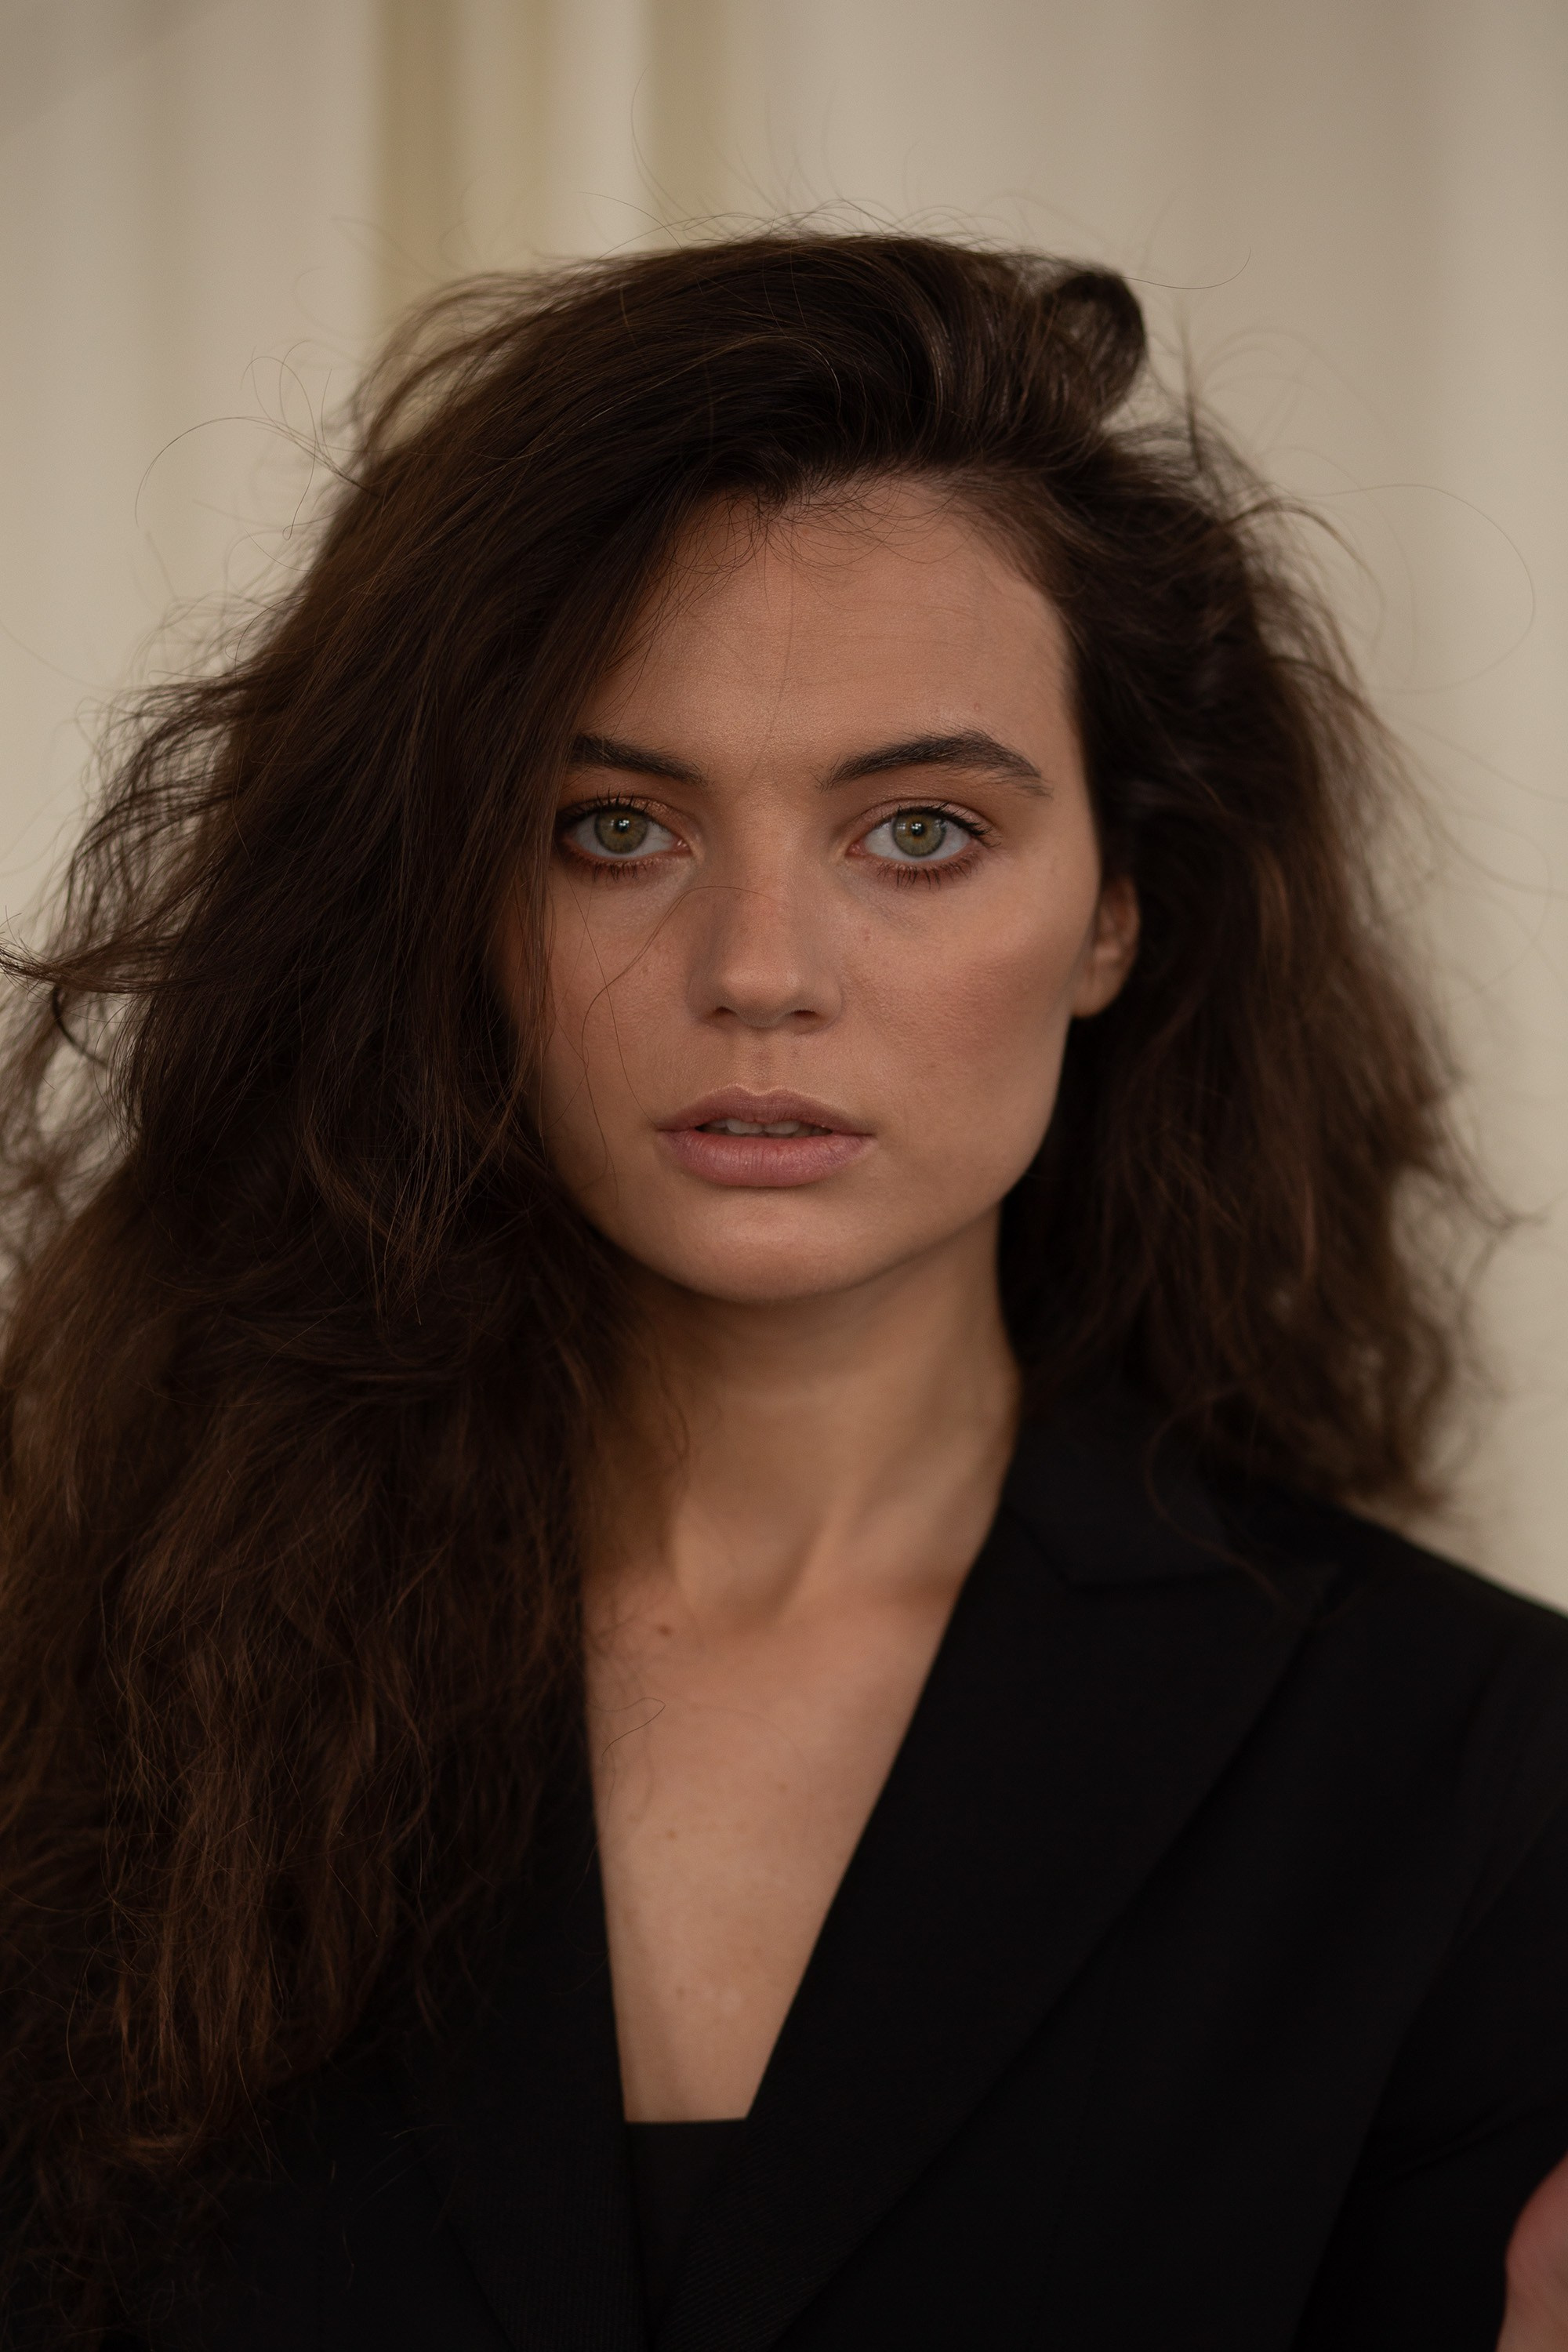
For the article I chose a portrait of a girl with a lush hairdo and very beautiful eyes, the author of the photo is Alex Bond and you can also download this image for training and repeat all the steps after me. I will describe in detail the steps that I use for almost every photo.
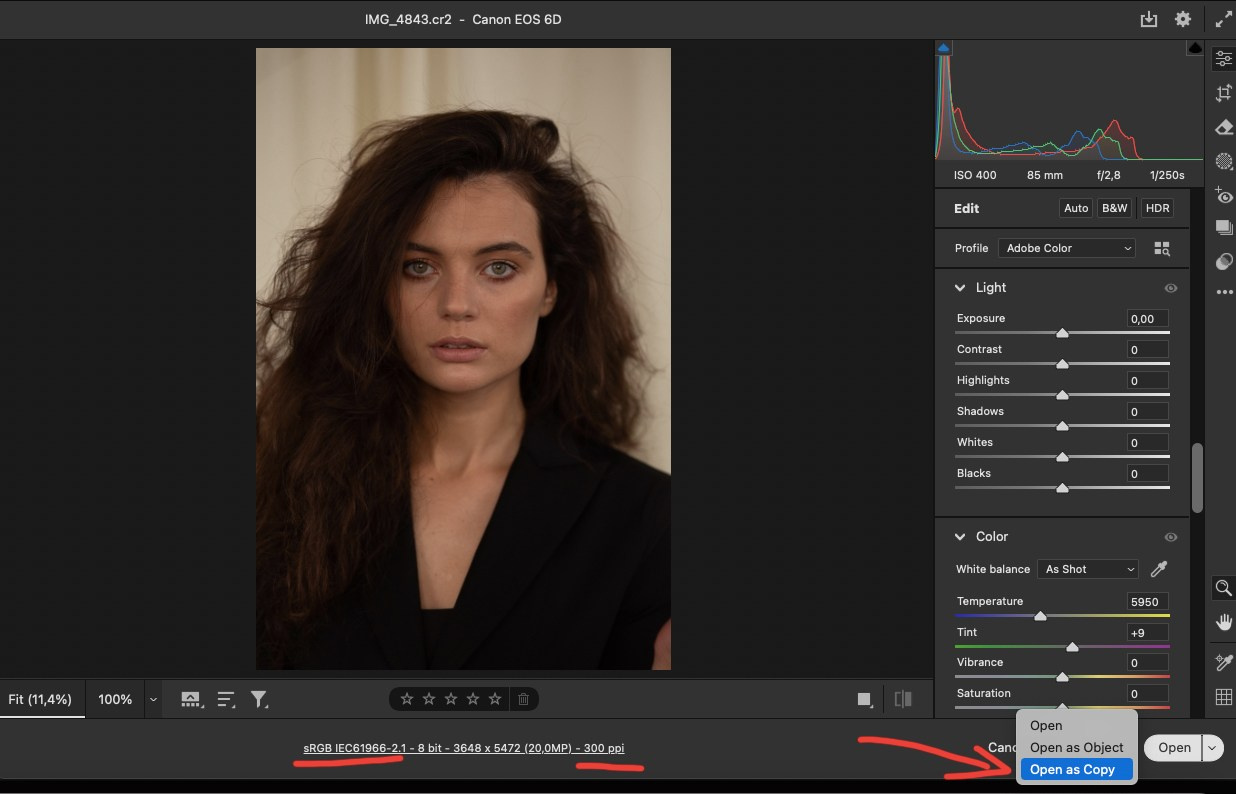
So… The first thing I do is download the file here ph. Alex Bond, Please remember to credit the artist if you use any of his photos in your work or portfolio.
- Some very important settings to check are the file profile, file bit depth, and dpi (I’ll go into detail about these values in future articles, but for now just follow along).
- Don’t forget to save the file after opening it on your computer or flash drive as a Photoshop PSD file, but for now just open the file in the latest version of Photoshop and go to the Camera RAW filter’s Develop settings for camera raw files.
🟢 Photo development in Camera RAW
At this stage, you need to analyze the file and understand which colors or shadows are too much and which are too little and simply move the sliders, following logic and common sense, for example, if everything is dark in this photo, then the black point is shifted and there are too many shadows and of course this needs to be corrected.
I always press the AUTO button to see the filter’s reaction and understand what colors and highlights need to be added or reduced, but this setting is very arbitrary and I never use it for the result, but it helps to make a quick analysis.
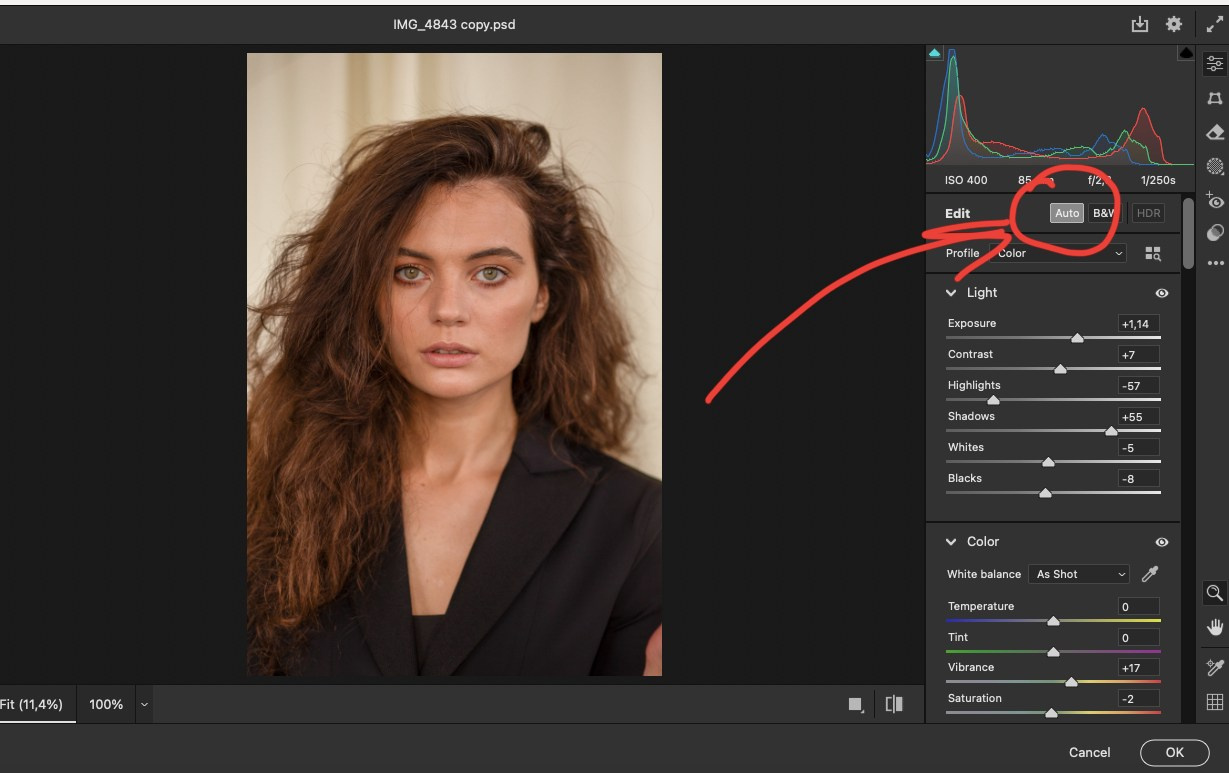
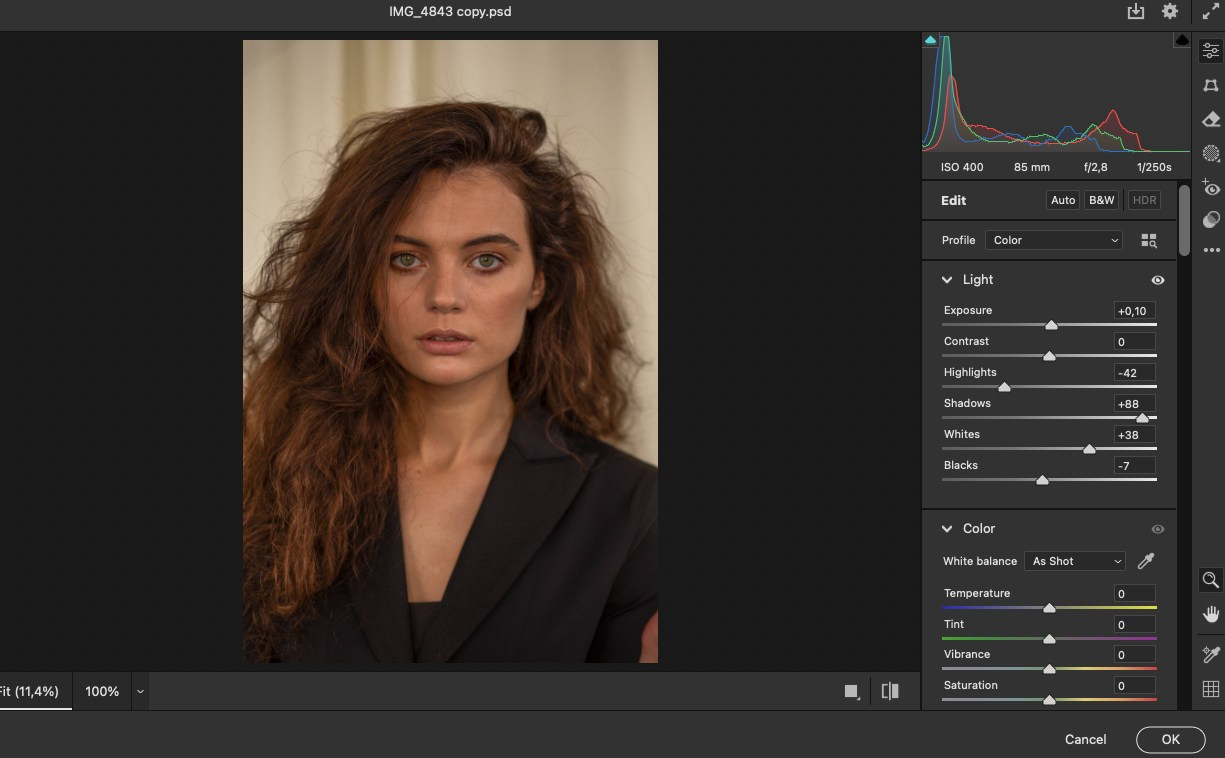
- You need to experiment and trust your eyes and I hope you have a good monitor with normal color rendering like me, but the topic of technology and monitors is a separate big topic. The main thing to understand is that the dark needs to be lightened, and the light (overexposures) needs to be darkened, if you follow these simple rules, you can easily adjust the white balance.
- Now it became obvious that the girl had beautiful red hair and this needed to be emphasized, because each person has their own individuality.
Be sure to make a copy of the layer Cmd+J (Ctr+J for Windows).
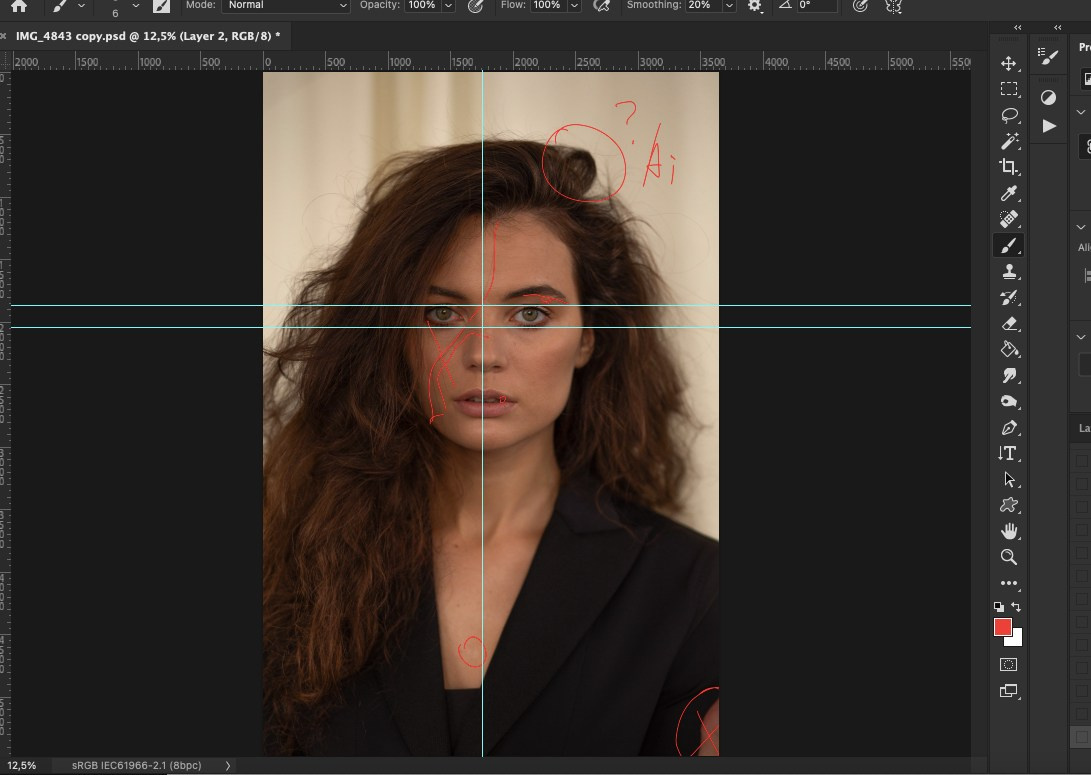
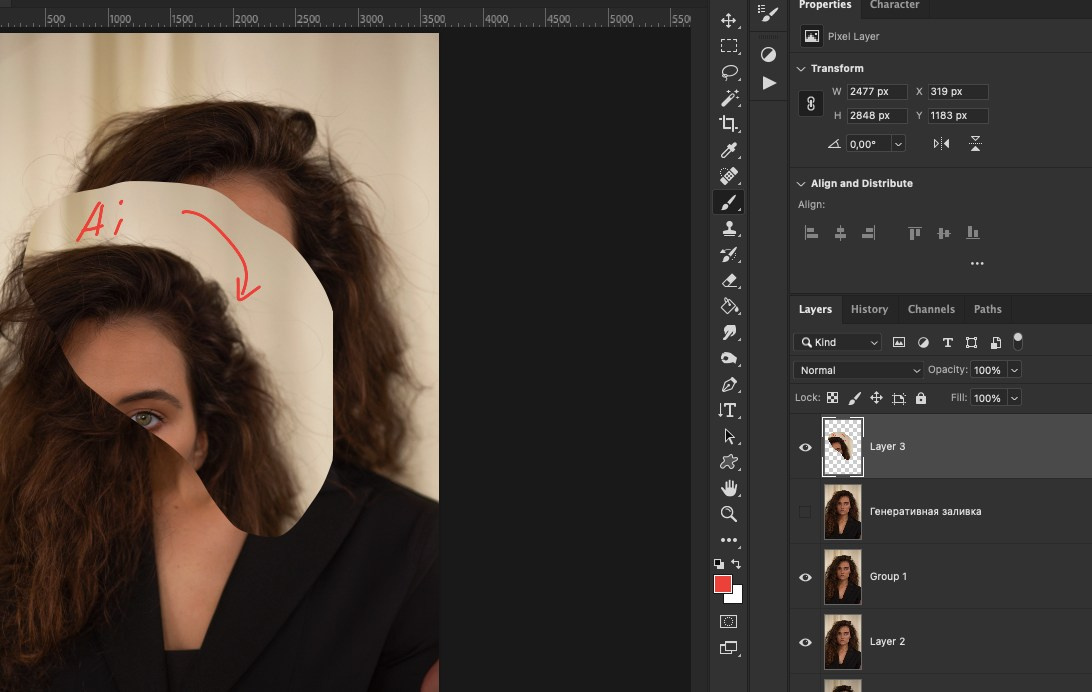
Let’s continue analyzing the image and pay attention to small details and debris, I marked them with a red marker.
- Need to remove excess hair on the face
- Correct your hairstyle using artificial intelligence
- Check the asymmetry of the facial parts (this is very easy to do — call the Ruler setting CMD + R and drag the lines from the top and side with the mouse to form a grid and then the asymmetry will become visible, if any). This model has almost no asymmetry and all parts of the face are approximately the same size, and the nose and eyes are located correctly relative to each other, so nothing needs to be done here, to make the grid lines disappear, press CMD+H
I completely forgot to say that you must not forget to press the key combination Cmd+S to save the result.
REMEMBER, this is very important!
Otherwise, you can waste a lot of time and lose the final and intermediate results.
🟢 So, let’s finally start retouching photos!
This process also consists of many steps, but I already do them very quickly and everything is brought to automatism, I always remember which step needs to be done after another… And you will succeed! The main thing is patience, persistence and faith in yourself!
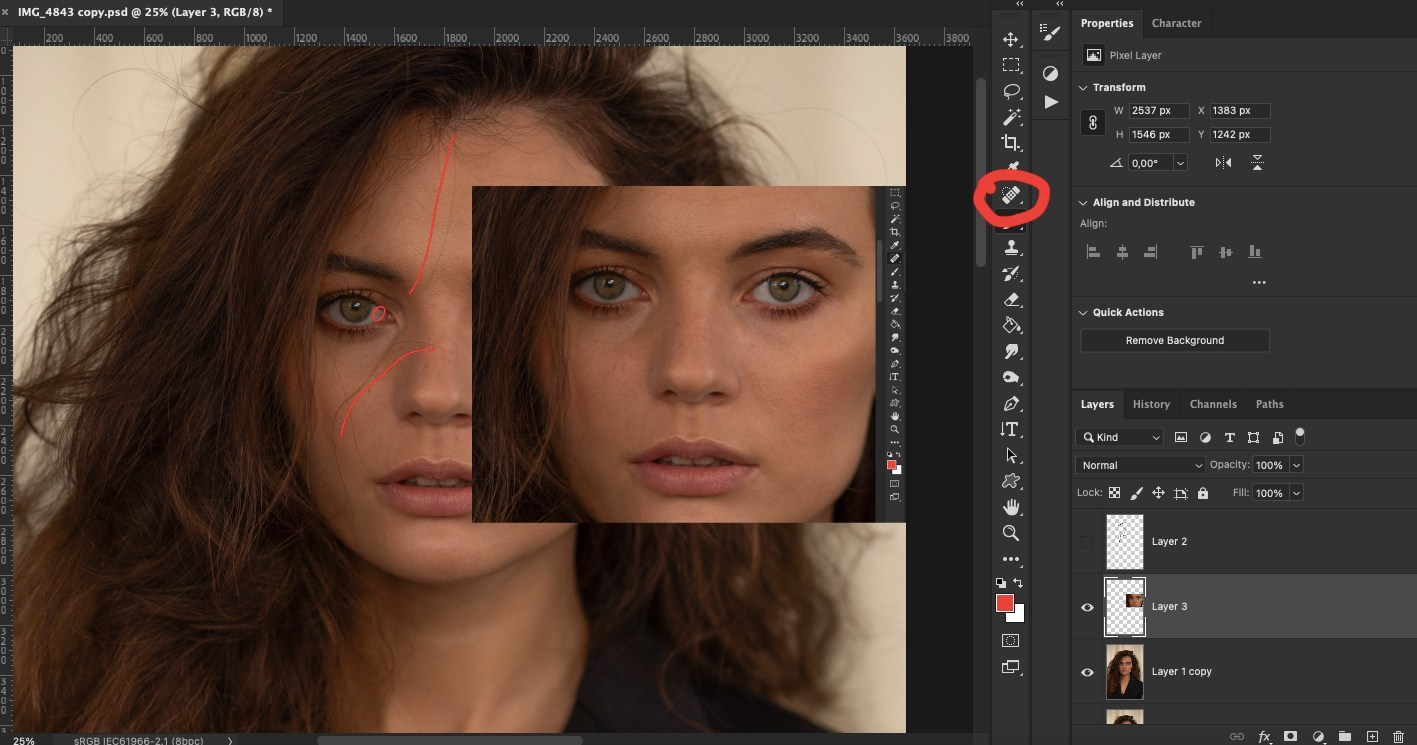
Cleansing Artifacts
On a separate layer, you need to remove debris, small hairs near the eyebrows, facial hair from the hairstyle, red capillaries in the eyes, etc., use the restoration or removal tools (Spot Healing Brush tool, Healing Brush tool), I marked this group of tools with a red marker on the screen.
Make sure that the Healing Brush tool does not leave streaks, if this happens, then reduce the brush diameter or change the tool to a neighboring one to paint over the artifacts with a clone from a neighboring area of the image.
Don’t forget to click Cmd+S (to save)
You can also merge layers together to avoid overloading your computer’s memory, you need to click on the top layer and hold Shift and click on the last one = CMD + E
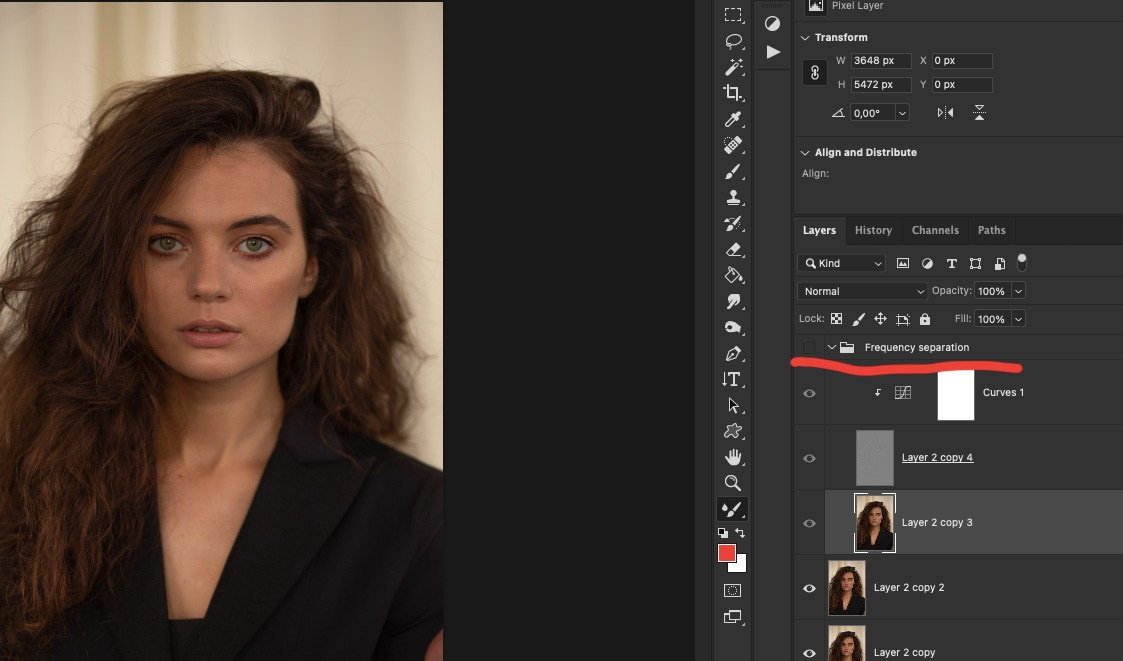
Frequency decomposition or Frequency separation in Photoshop
I always combine several skin retouching techniques, let’s start with the first one — Frequency decomposition or Frequency separation.
I attach detailed step-by-step instructions on how to use this method. In the slider you will find illustrations for the description.
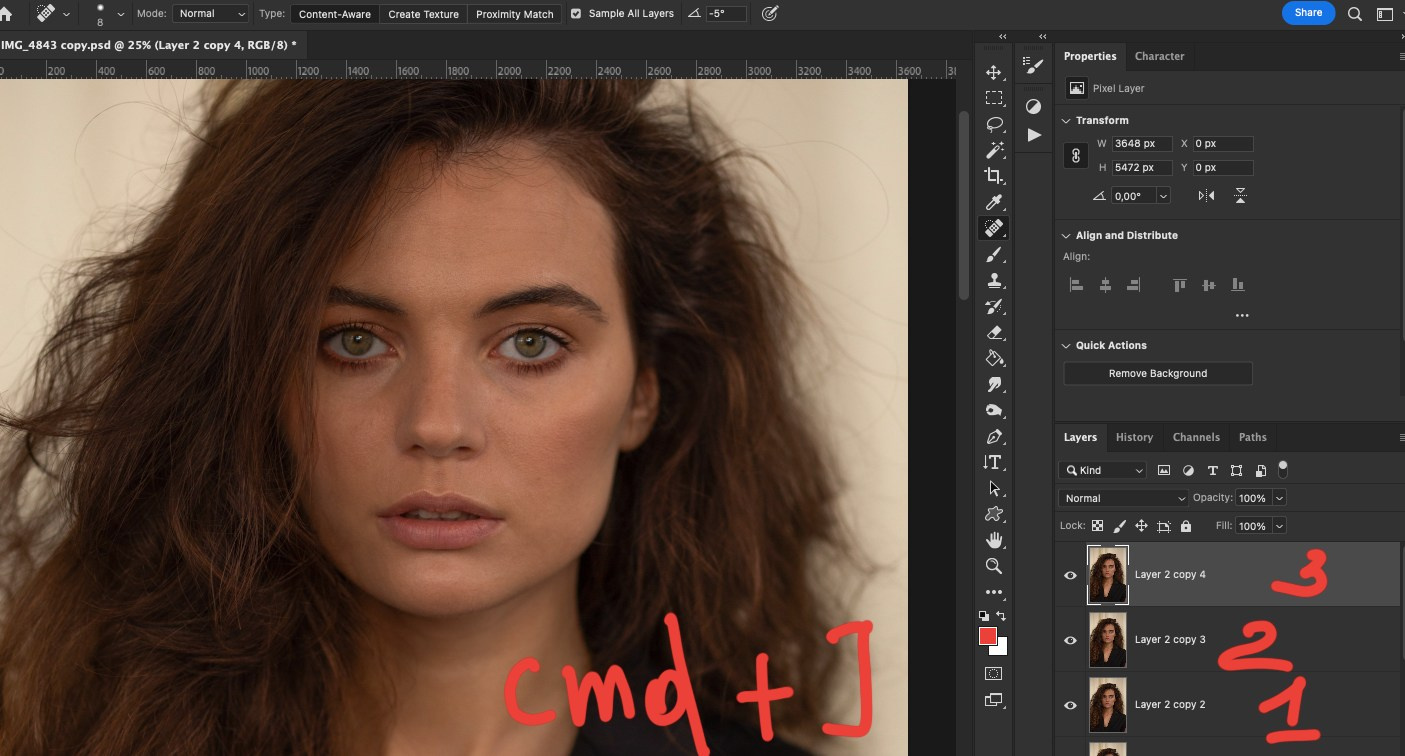
1. Make several copies of the layer Cmd+J
Frequency decomposition requires multiple layers of a file to break it down into high and low frequencies.
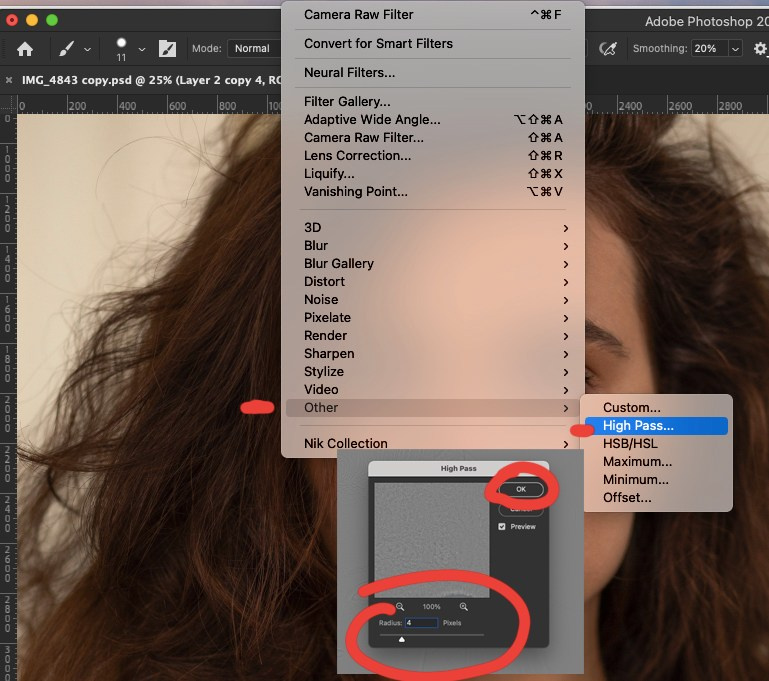
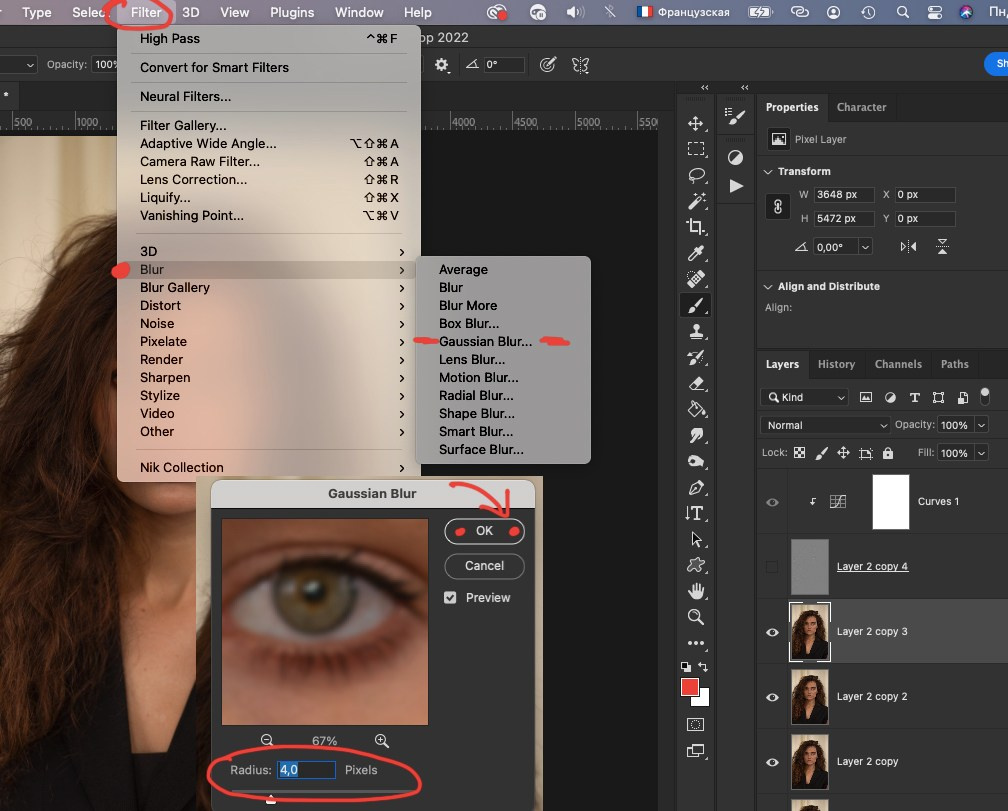
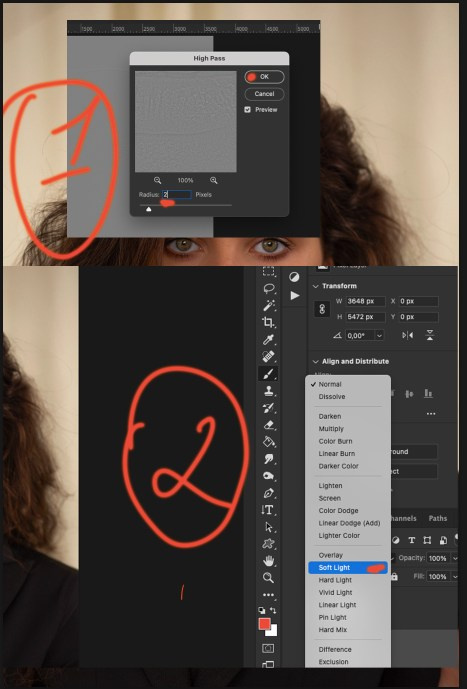
2. Filter High Pass
Distribute the first layer on high frequency and choose a radius of 4 pixels.
Filter➡︎Other➡︎High Pass➡︎
4 pix➡︎OK

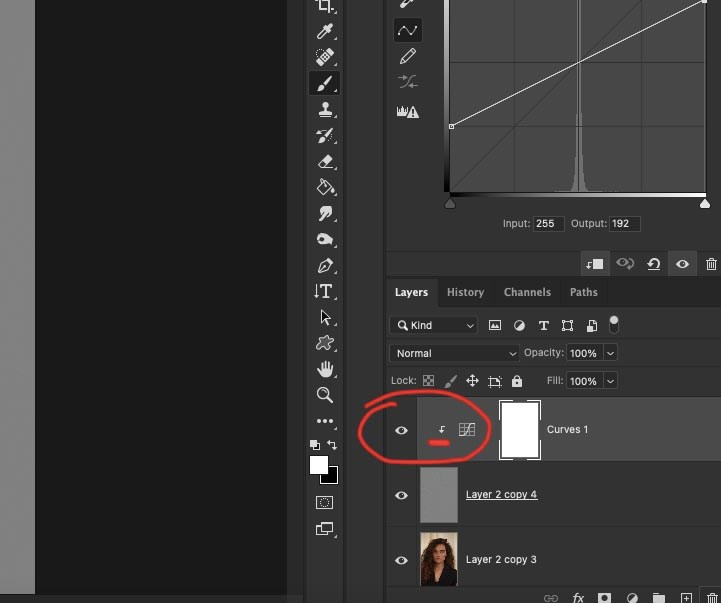
3. Curve line settings
Now you need to call the adjustment layers menu and find the CURVES item, set the point on the left to 64 Output /Input 0 (pull the line up), also change the value of the point on the right to 192 Output/ Input 255 (pull the line down), the result should be a line like in the illustration.
4. Linking a layer to a lower layer
It is very important to link the curves layer to the lower layer with high frequency, to do this move the cursor between these two layers and press Alt
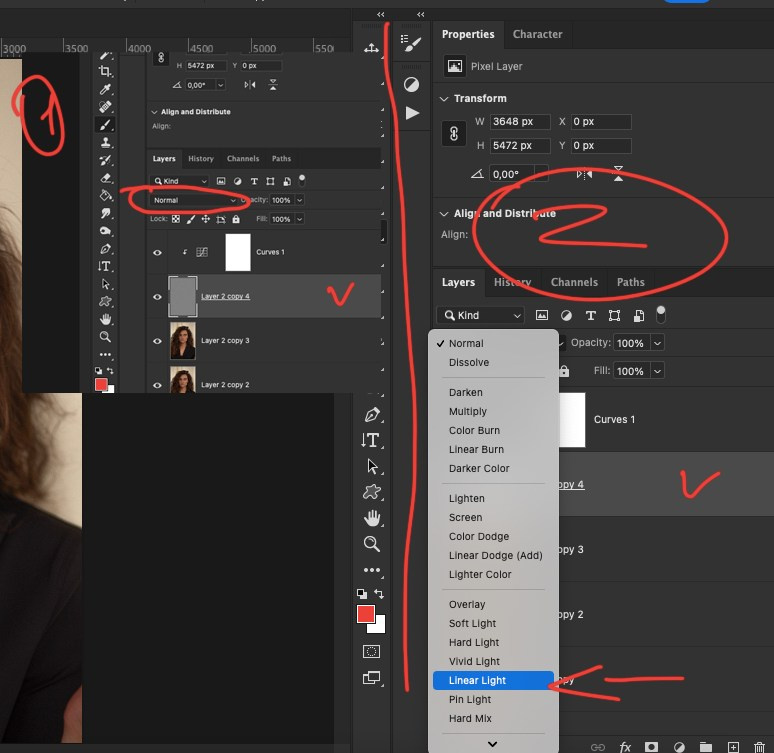
5. Blending mode: Linear Light
For correct high-frequency decomposition, you need to set the blending mode of the High Pass layer to “Linear Light”. Follow the illustrations and steps carefully…
6. Low Frequency=Gaussian Blur
Turn off the visibility of the high frequency layer (eyes) and blur the low frequency layer with the same value as last time so that the radii are the same.
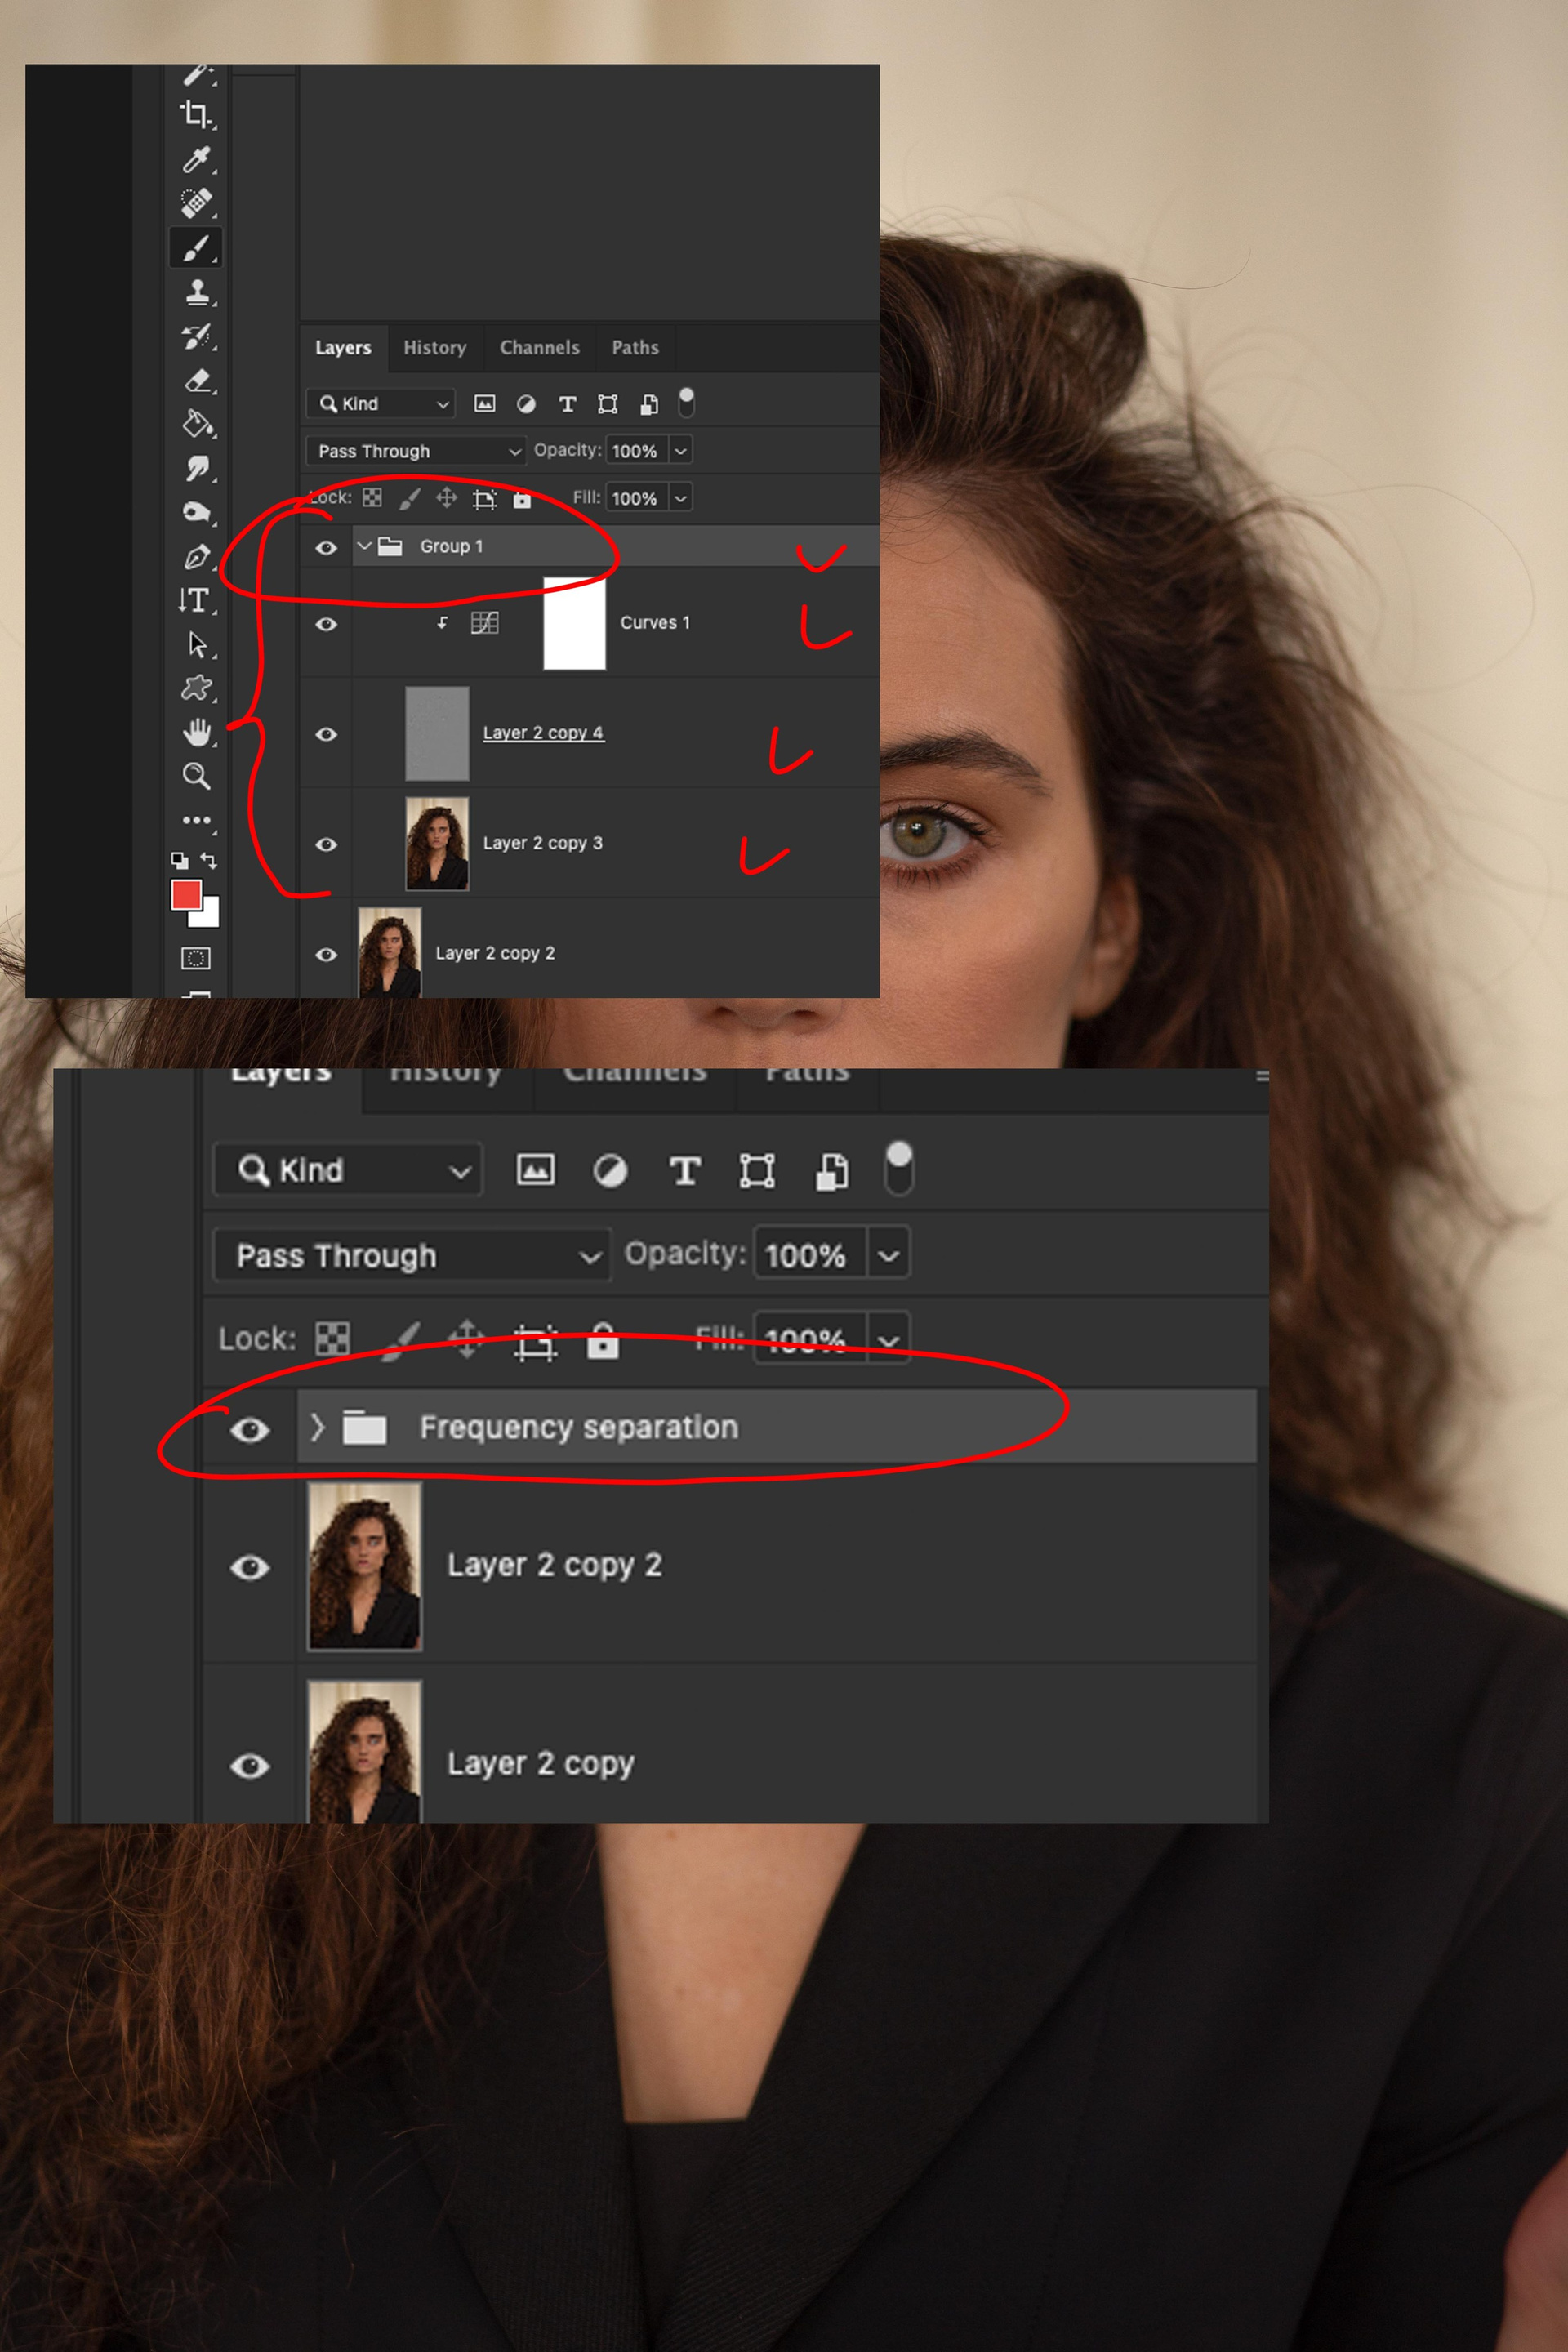
7. Group layers and rename folder
Select all layers that relate to frequency decomposition and group them, you need to select the first and the last one so that they become gray and press Cmd+G.
Rename the folder for convenience.
8. Great
Congratulations, if you followed all the steps sequentially and correctly, then hiding the folder (eyes) should not change anything. Try turning the folder on and off, if what you see is very different, then a mistake was made…
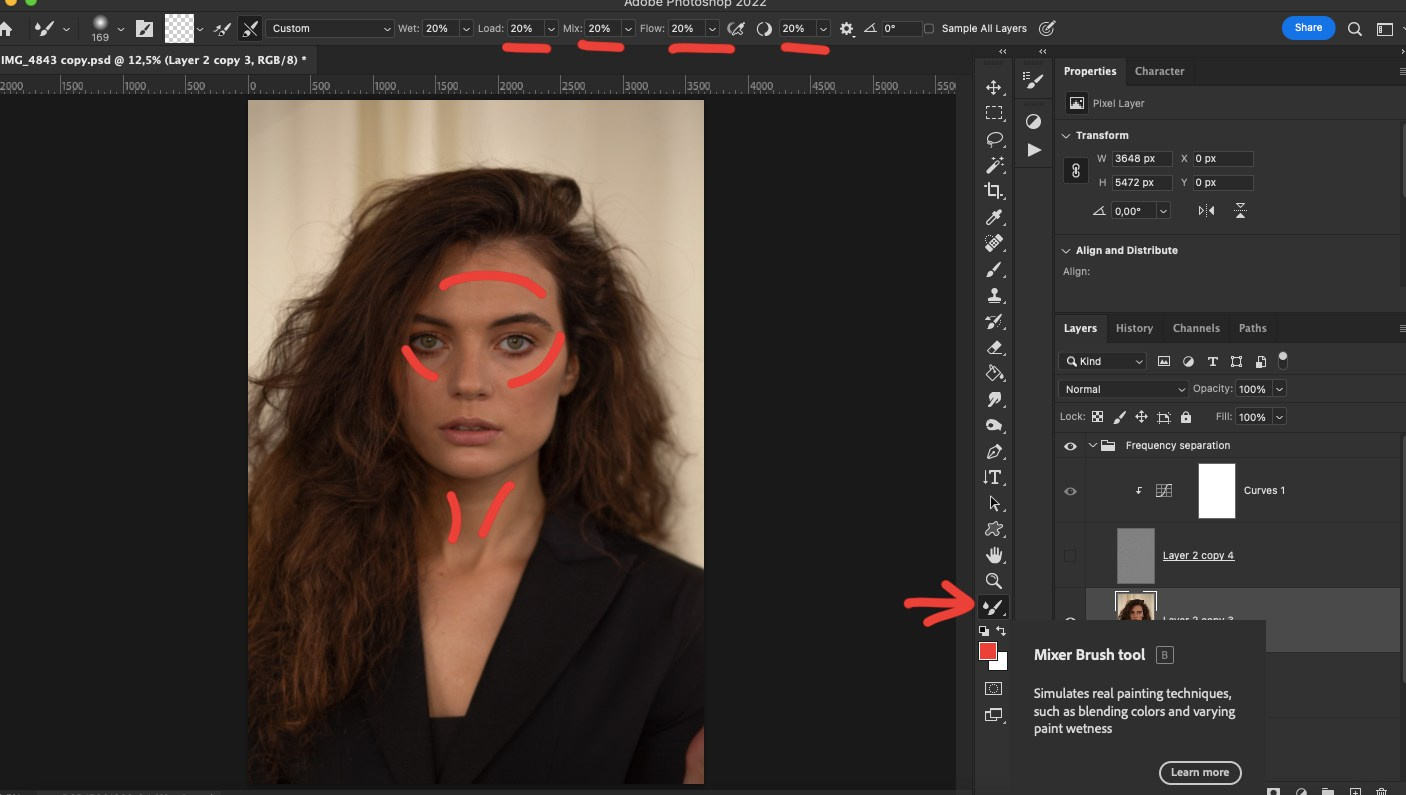
9. Mixer Brush tool
And now, finally, you can move directly to retouching, you need to move along the massage lines on the face, as if smearing dark spots (the effect of a wet rag), but in general this tool is universal and with experience you will understand that in this way you can clean not only the skin of the face, but also clothes or the background.
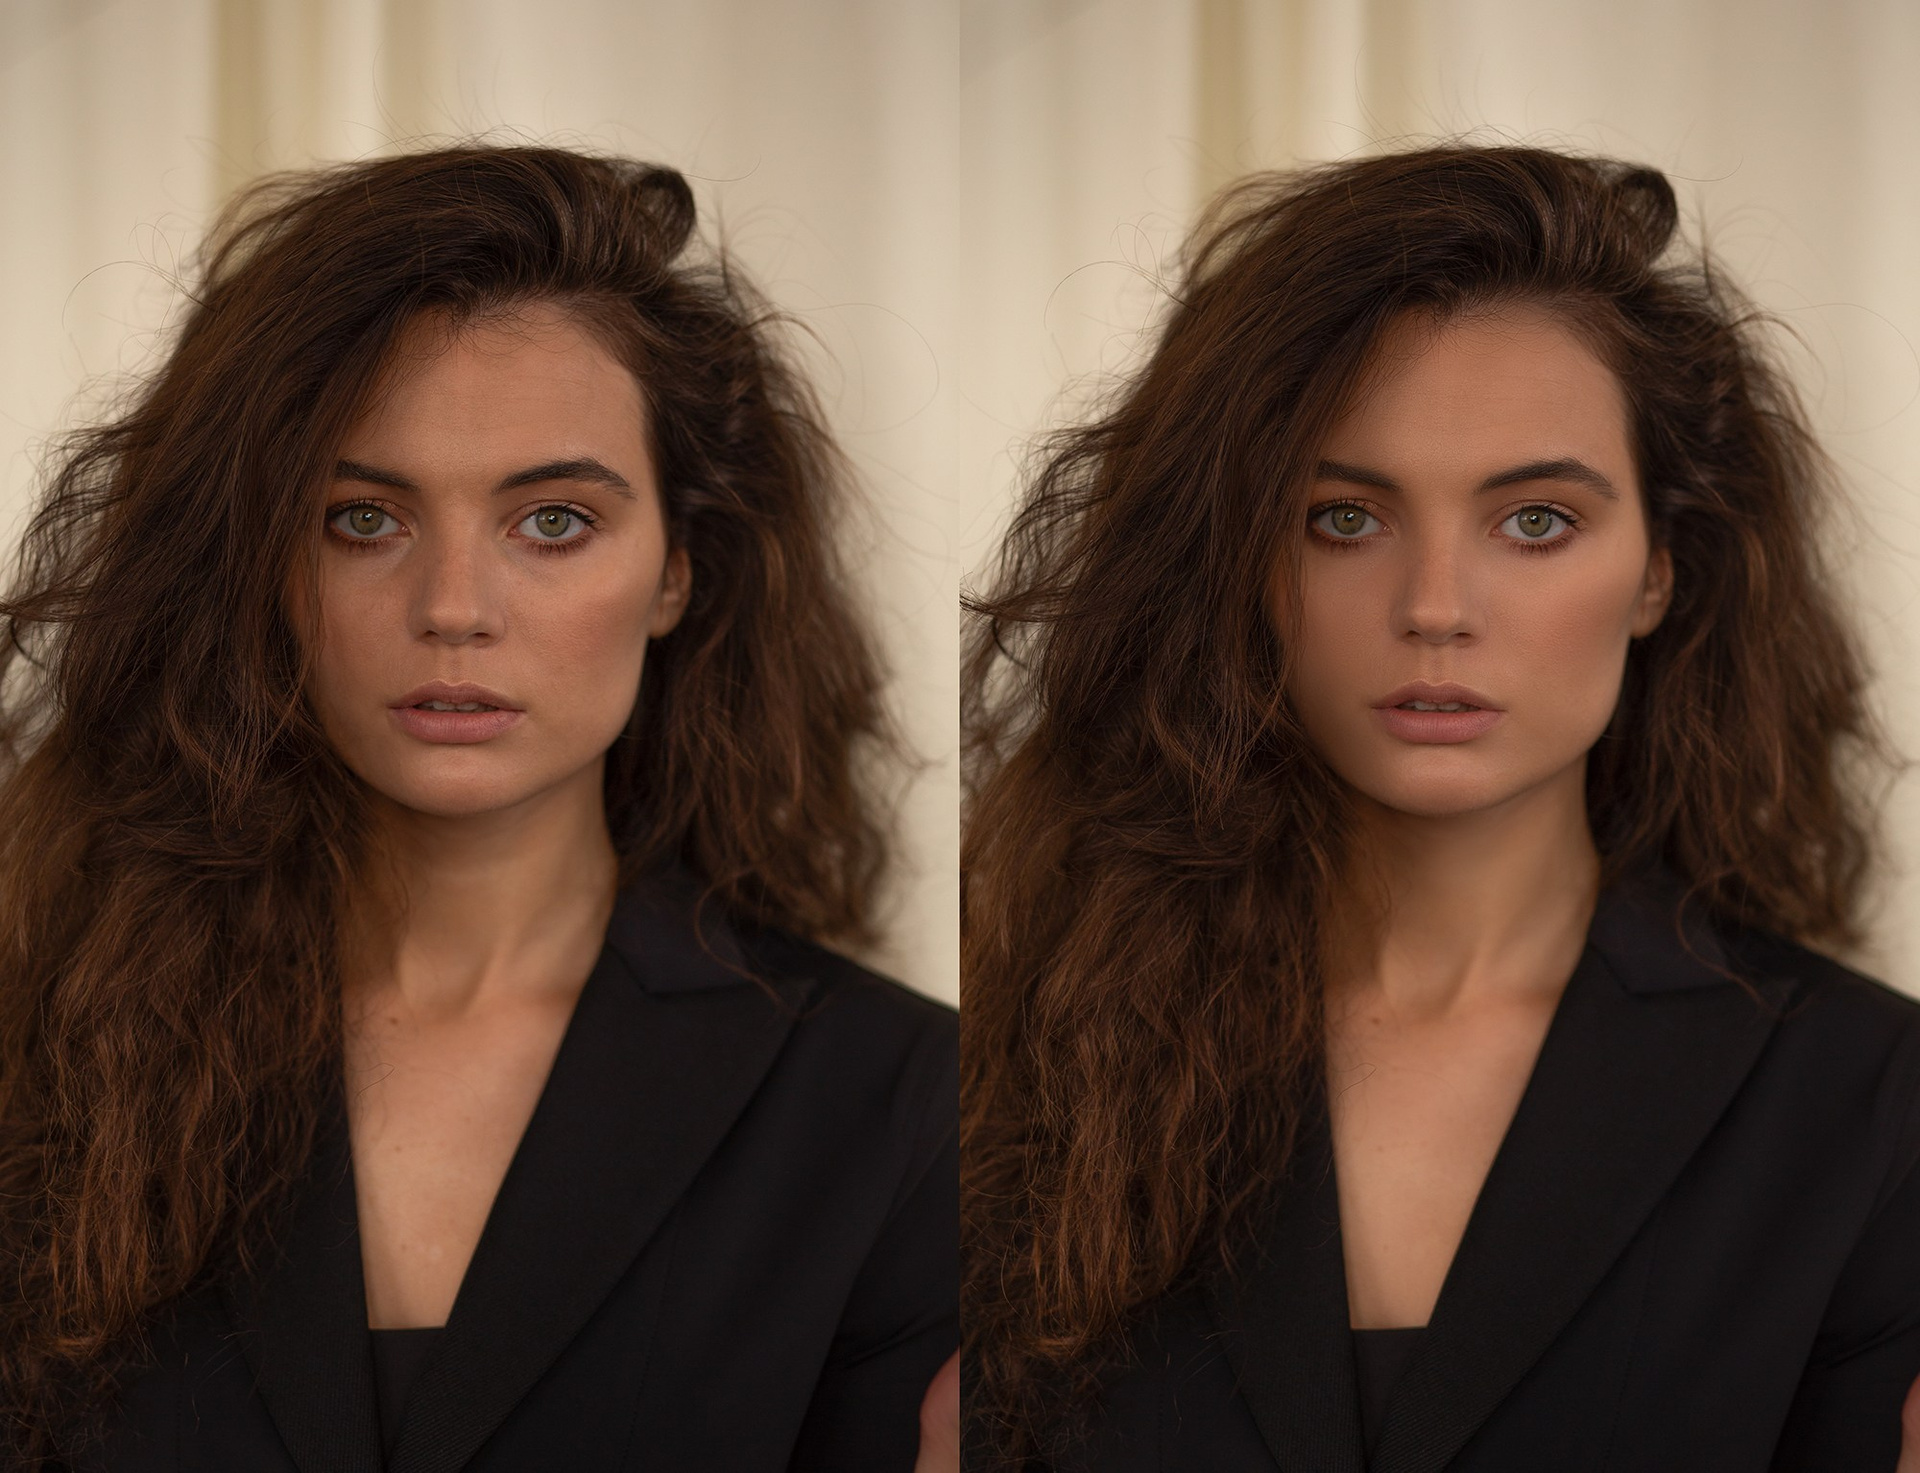
After working with the mixer brush, you should have a face with smooth skin without blemishes, for comparison I have attached a before/after photo.
Don’t forget to reduce the opacity of the Frequency Decomposition folder to 75%.
You need to merge the layers and make a cast of all the layers.
Cmd+Alt+Shift+E
And make several copies of this cast.
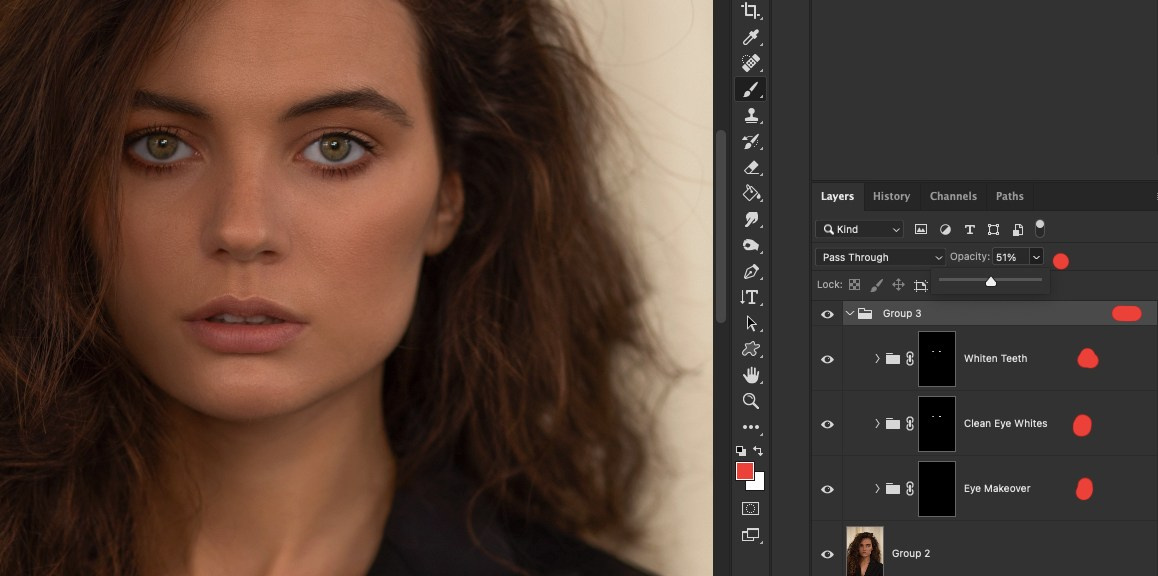
10. Teeth Whitening, Eye Shine in Photoshop
Now we need to lighten the whites of the eyes, lighten the teeth and add shine to the pupils of the eyes, I use actions and if you need them too, write me an email colorifyretouch@gmail.com
don’t forget to group these folders and reduce the opacity of the main folder by half (see the illustration)
Artificial Intelligence in Photoshop
Modern Photoshop is very useful in our work and we can change the model’s hairstyle using generative fill.
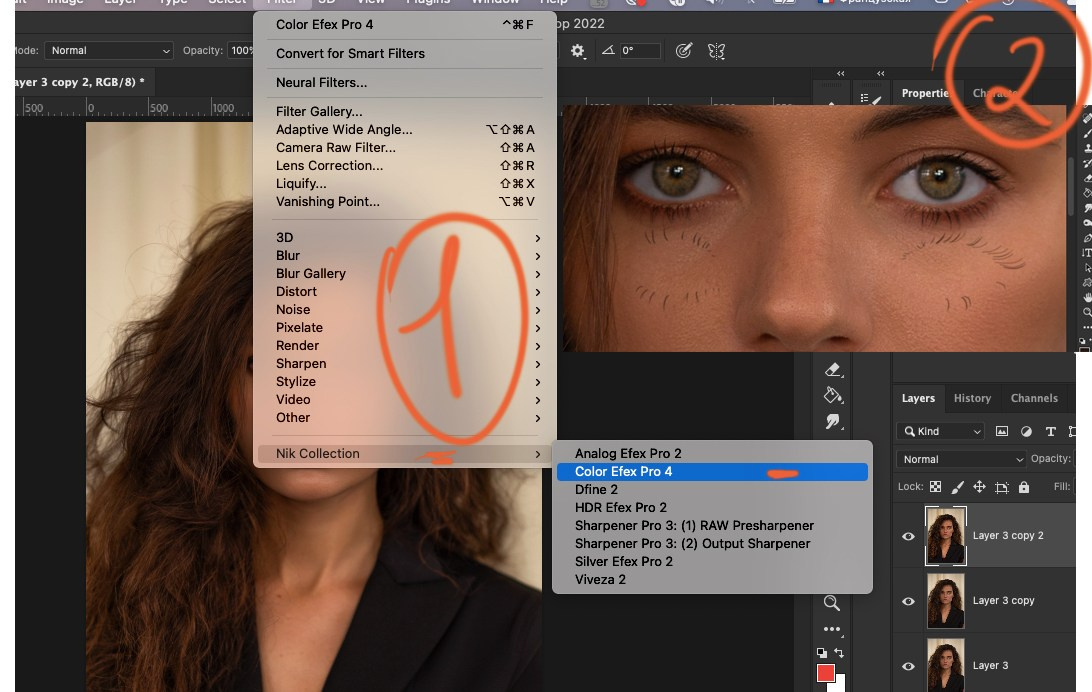
11. Nick Collection Filter
I recommend downloading the incredible Nick Collection filter, for this portrait I use the Color Effecx Pro 4 ➡︎ tonal contrast.
Adjust the layer opacity so you don’t go overboard. I also painted the eyelashes with a regular brush at low values and applied a 1px Gaussian blur to the layer.
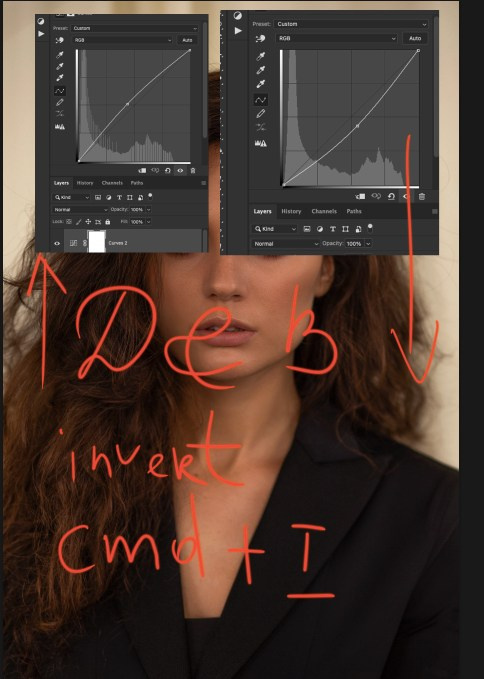
12. Dodging and Burning in Photoshop
Another interesting and versatile way of lightening and darkening with curves. You need to call 2 layers of curves in the menu of adjustment layers and adjust them, one curve is responsible for lightening, the other for darkening, we remove spots on the skin with a regular brush with a value of Opacity 100 / from flow 2-5.
Invert both masks (Cmd+I) to black and paint with a white brush on black.
Carefully wipe the dark spots with a white brush = lighten them and vice versa, light spots with a dark brush = darken them, watch the process carefully and do not change the light and shadow pattern of the face too much, otherwise the model will not look like herself. Do not forget to blur the edges of the mask using the feathering setting and remove excess saturation from both masks.
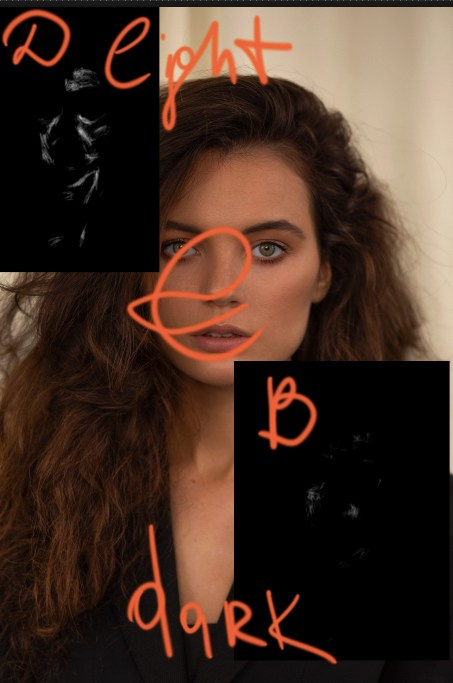
13. After the D& B algorithm
you should have 2 masks (see illustration), don’t forget to blur the edges of the mask using the feathering setting, you can find it if you click on the mask = you will see 2 sliders = you need a feather, move it to the side by 8 pixels.
14. Macro Detailing/Sharpening in Photoshop
To increase the sharpness and clarity of the frame, use the method described in the illustration, apply the High Pass filter to the top layer within a radius of 2 pixels and switch it to the Soft Light blending mode.
Merge the layers into one Cmd+E (layer cast — described above) and do not forget to save the result Cmd+S.
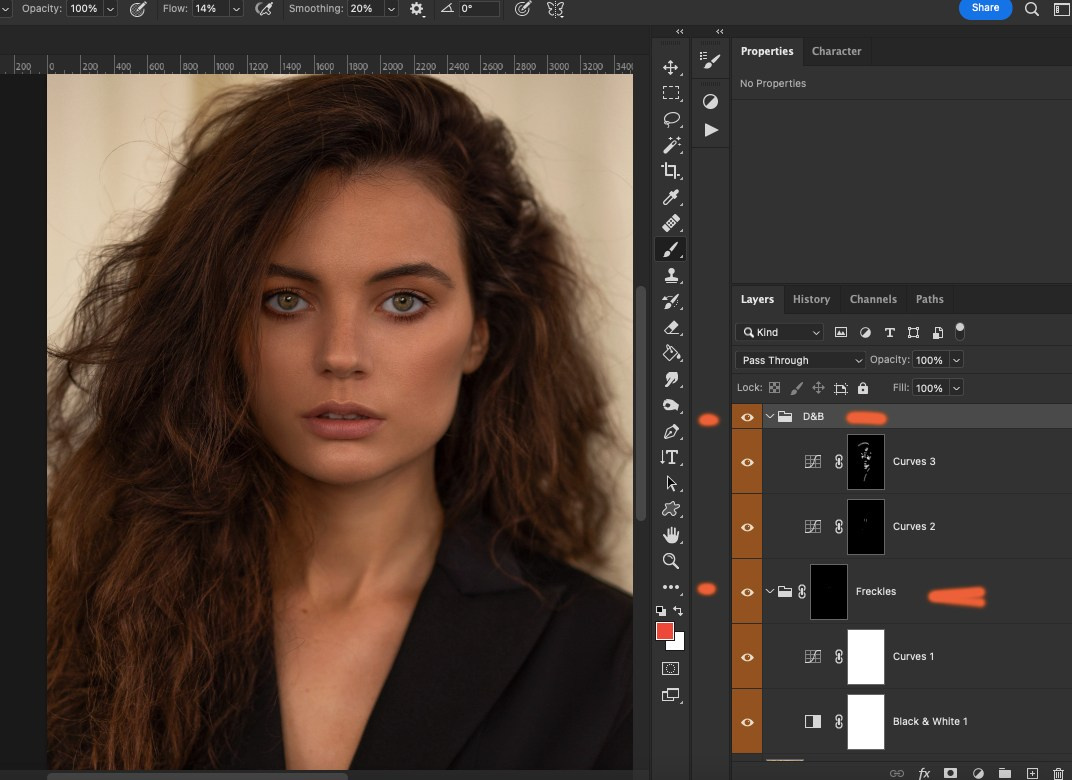
15. Enhance Natural Beauty/ Freckles in Photoshop
Naturalness is trending now, and if a model has cute freckles, they can be enhanced with action.
Work them over the mask with a soft brush, blur the edges of the mask with feathering and reduce the opacity of the entire freckles folder to 25–30%.
Use the D& B method to select the highlights and shadows, remember to blur the feather of each mask and reduce the folder opacity to 75%.
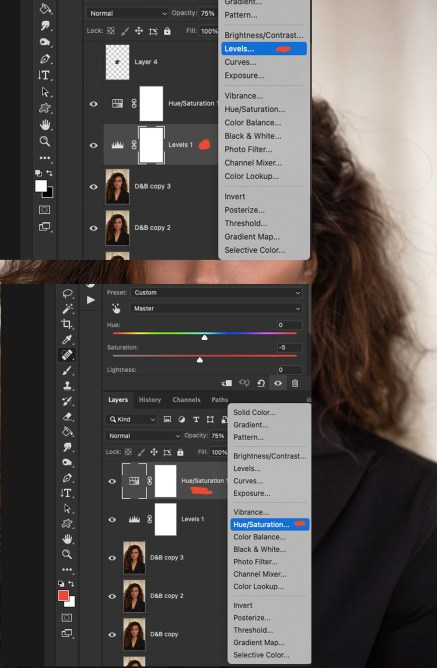
16. Hue/Saturation and Histogram/ Levels
Final adjustments to the photo before final saving. You need to call 2 adjustment layers: the Levels layer and the Hue Saturation layer.
The model’s skin is currently too orange, and to make it look natural and neutral-pleasing, we need to change the settings of the Hue Saturation adjustment layer.
Master -5; Red-5; Yellows -5; Blue -5
The Levels layer is responsible for the histogram and to make it look like a “comb” without gaps, you need to shift all the colors to the right and left until a peak or hill begins (if you have no experience at all, it is better to just click on Auto). Next, play with the opacity of these two layers and leave it at a value that is acceptable for you, for me it is usually 75%.
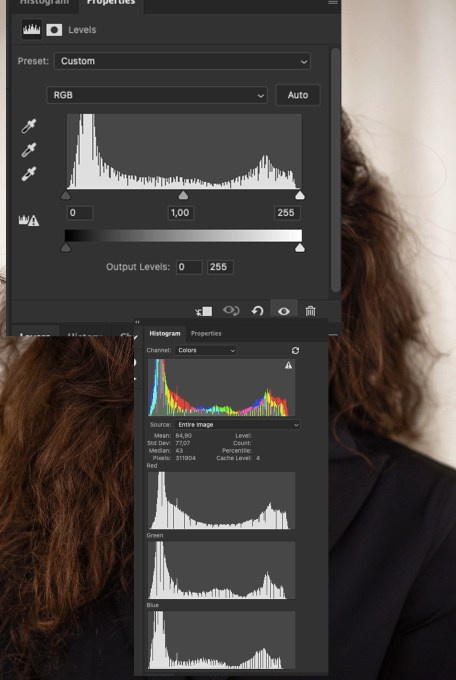
Histogram “Comb” in Photoshop
If you learn to read the histogram correctly, your white balance will always be excellent, just remember that the right margin and the left margin should start from the edge of a hill or peak, and the histogram itself will always look like a ridge.
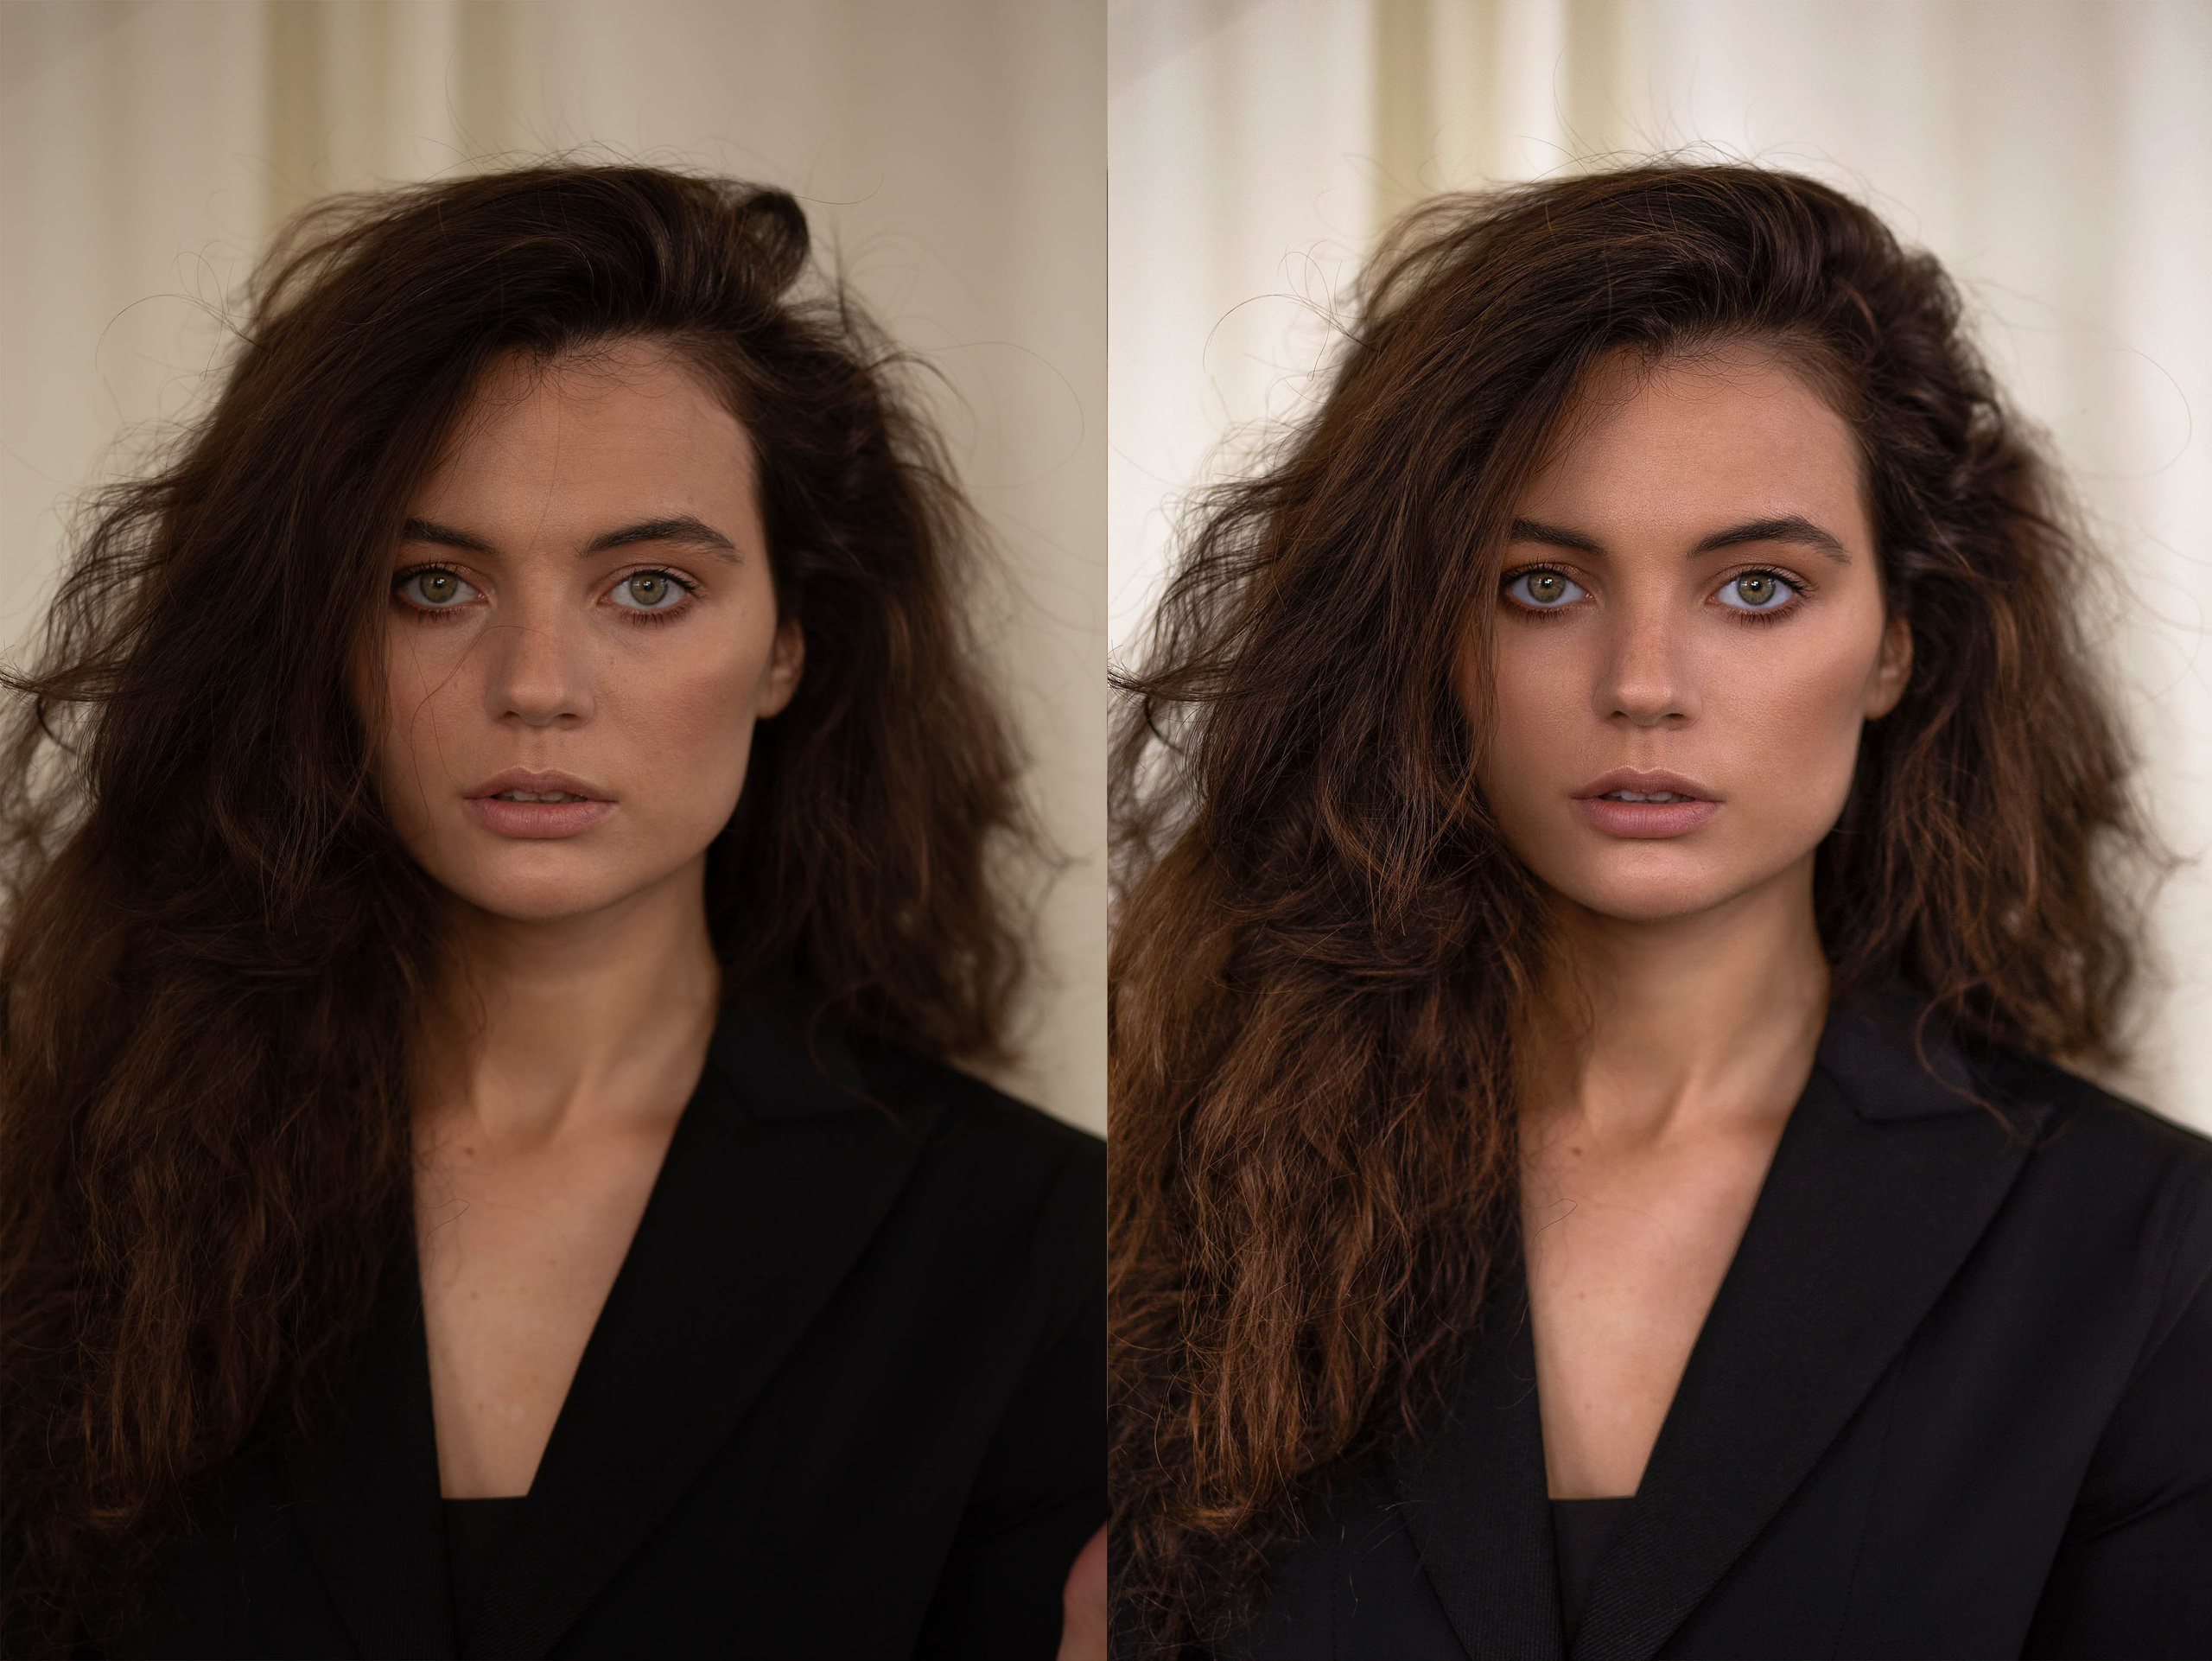
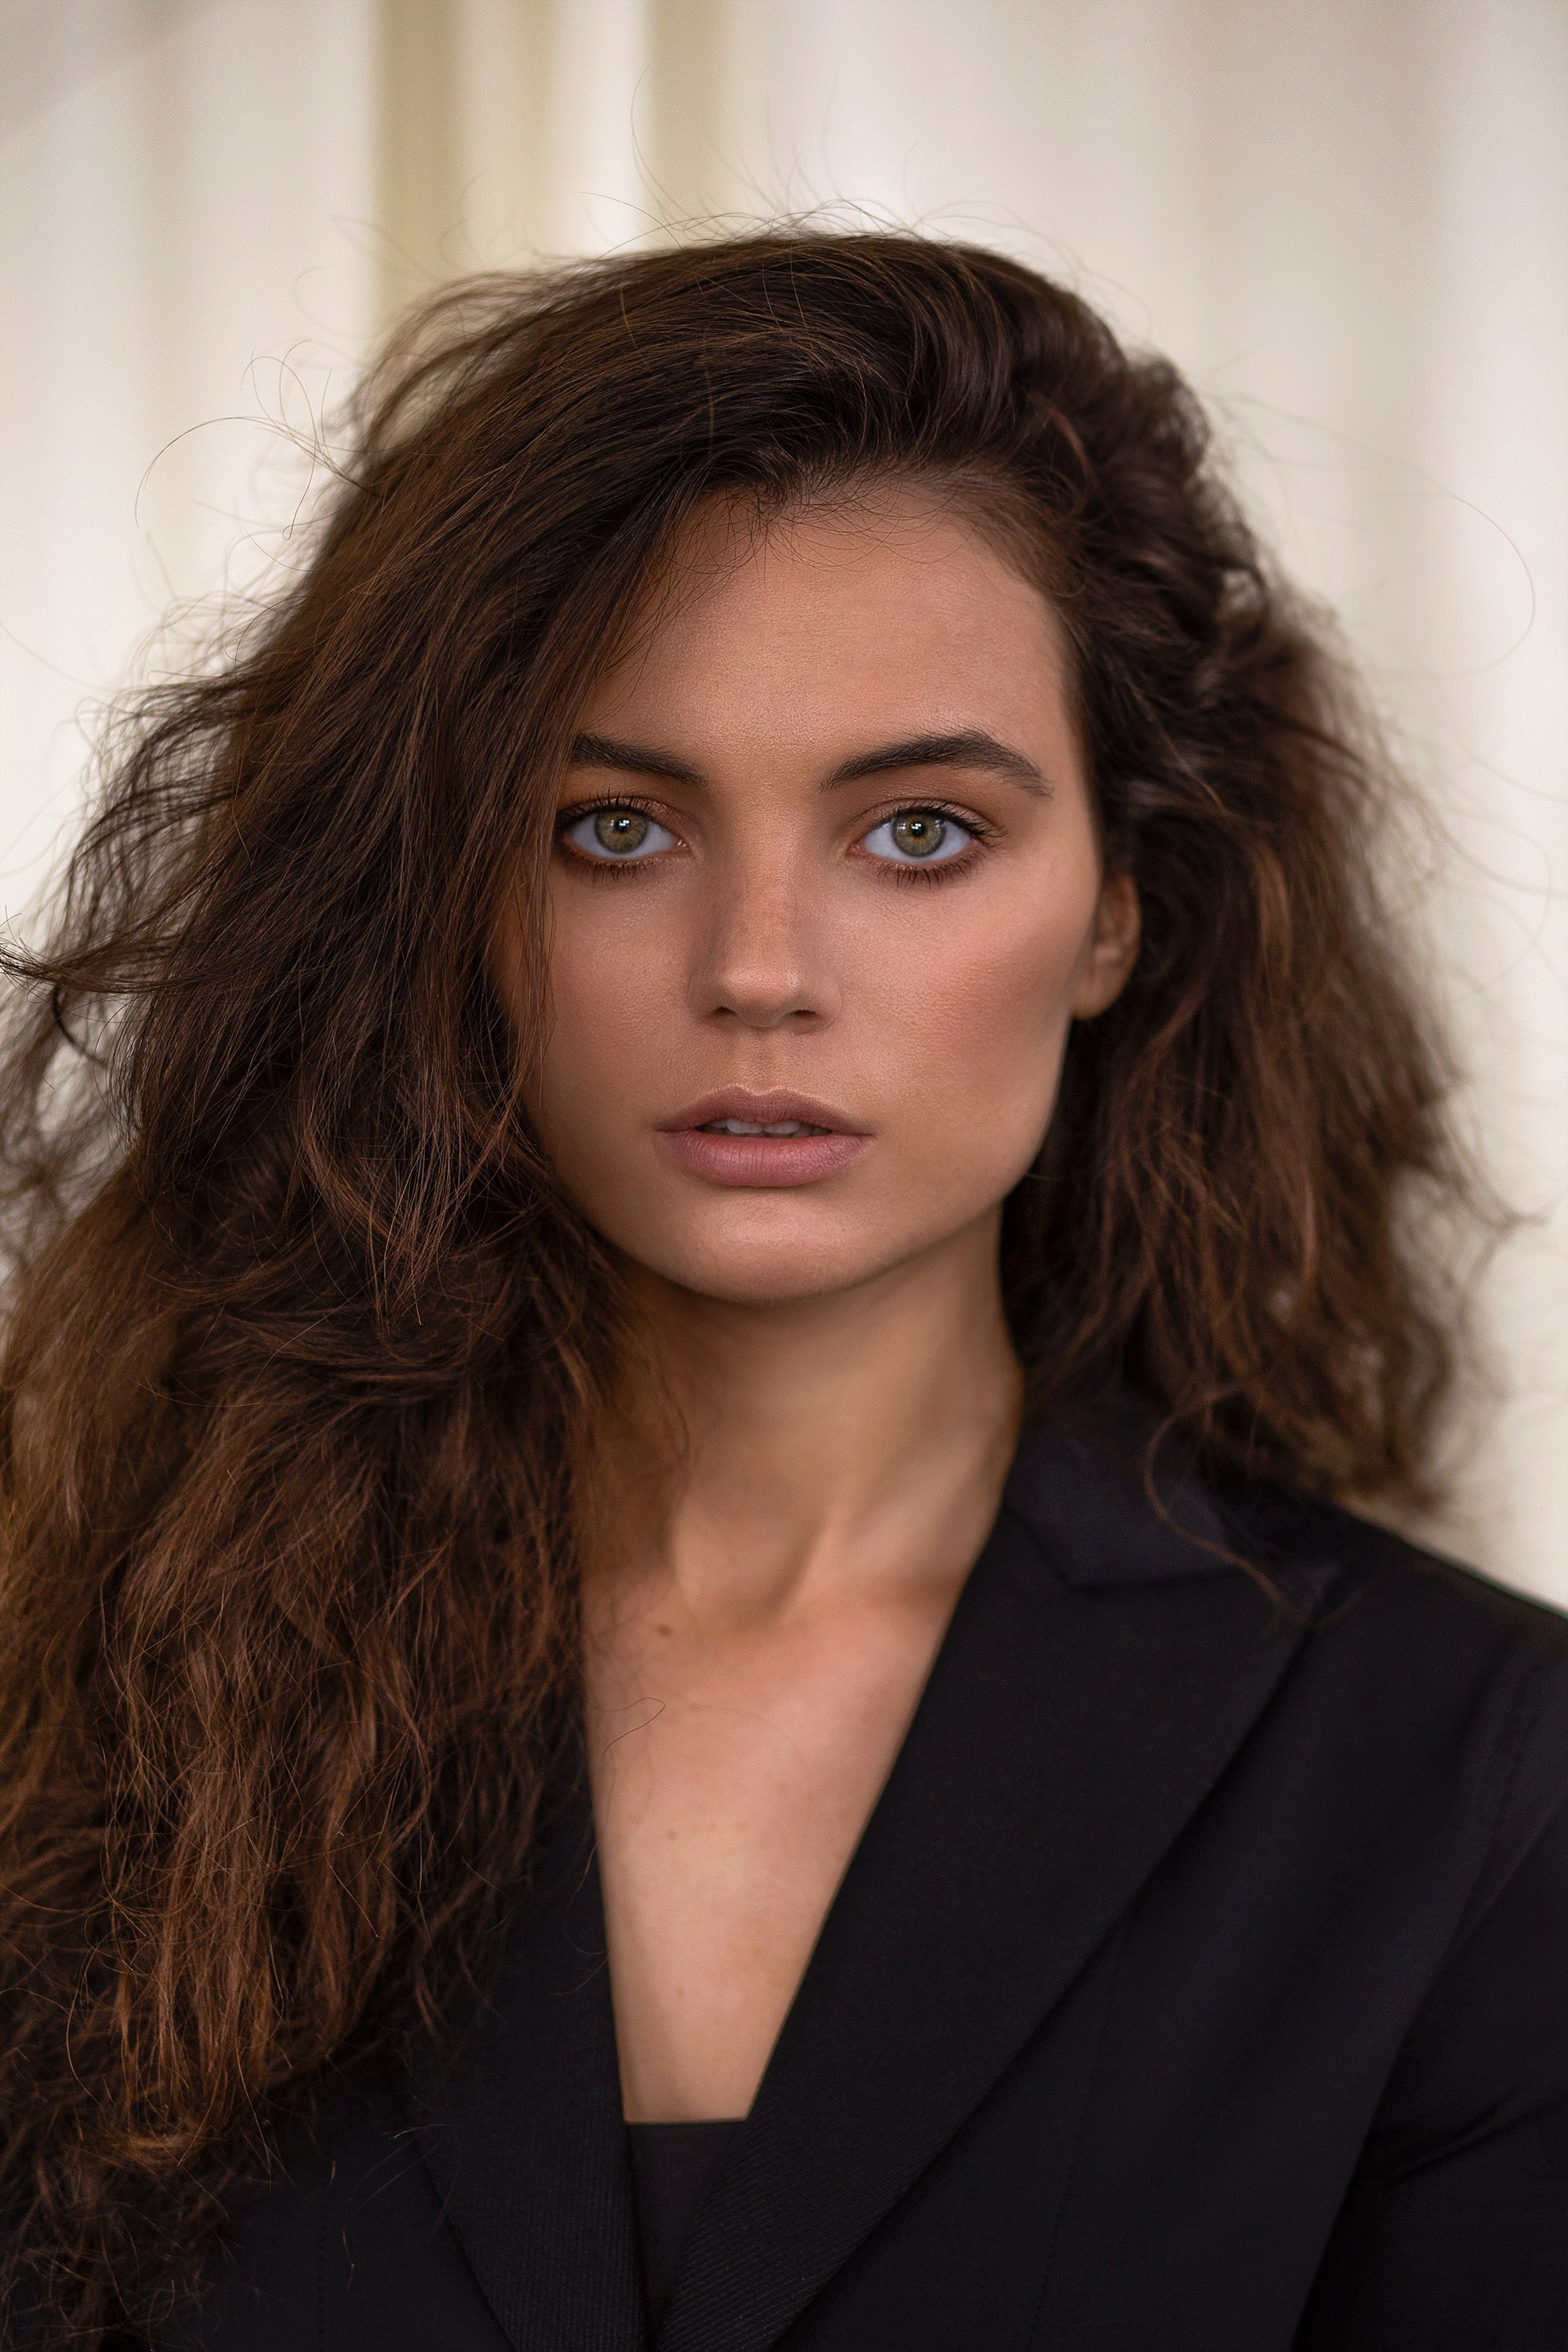
Result Before/After
I hope this article was useful for you and you repeated all the steps after me and, of course, you succeeded! Practice and over time you will be able to perform all these routine actions very quickly, like a professional image retoucher…
Social media
Education|Shop
Retouch course Basics+
Retouch course Pro+
RawFiles Free
Prints